
Dinner rolls used to feel so overwhelming to make. That was when I was mixing all the ingredients by hand. Mad props to all the people out there who still do this and to all my ancestors who had no other option. My first Christmas with my husband, he found a killer deal on a KitchenAid Stand mixer and gave it to me as a present. Not only was I super stoked (I know it’s probably weird to be excited about a stand mixer), but it was an absolute GAME CHANGER in my baking. Rolls, cookies, cheesecake all became so much easier to whip up.
I’ve made lots of different recipes, but this Lion House roll recipe is my go-to for Sunday dinners, holidays, you name it.
I’ve learned a few tricks over the last few years that have made a difference in these rolls when I make them. Keep them in mind when you give this recipe a try.
Helpful Tips
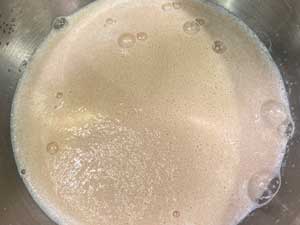
- You don’t want the water too hot or too cold. If you want to measure the temperature, anywhere between 105 and 116 degrees F should be safe. Think of the temperature of a baby’s bottle or bath. I like to let my yeast proof (let it sit and get foamy) before I add everything else in to make sure I got the temperature right. This usually takes between 5-10 minutes. See the picture below for what “foamy” will look like.
- The type of flour really does make a difference. Bread flour will yield a fluffy, yet stable roll. You can use all-purpose in a pinch, but if you can get bread flour, do it.
- You want the dough to be somewhat sticky. If it’s not sticking to your finger at all, you’ve added too much flour. If it’s sticking completely and won’t let go, you need more flour. Start with less and add more because once the flour is in there, you can’t take it out.
- Use real butter, not margarine.
- If the flour has a tendency to escape the bowl of the mixer, drape a clean hand towel over the mixer and bowl, it will keep the flour contained rather than sending it to the high heavens and everywhere in between.
- The rolls will rise twice. Once after you mix the dough and again after you make the rolls. Rising time for the roll can take anywhere between 40 to 90 minutes depending on the temperature of your home.
- A pizza cutter makes cutting the rolls up, once rolled out, go much faster.
Lion House Rolls Recipe
Lion House Rolls
Ingredients
Instructions
-
Combine dry milk and warm water.
In the large bowl of an electric mixer or in a separate glass bowl, combine the water and the milk powder and stir so the milk dissolves.
-
Add the yeast to this mixture while water and milk is still warm.
Let the yeast proof (dissolve and start to react) for a couple of minutes. It helps to cover it with a towel to get it to proof. It should look foamy. -
Next, add the sugar, salt, butter, egg and 2 cups of the flour.
Mix on low speed of mixer until ingredients are wet, then turn to medium speed and mix for 2 minutes. Stopping the mixer to scrap the sides, as needed. -
Add another 2.5 cups of flour
Mix on low speed until the ingredients are wet, then turn mixer on medium speed and mix for 2 minutes to knead. The dough will be getting stiffer. You may also want to scrape down the sides to make sure all the flour gets incorporated and doesn't clump in one area. -
Add up to 1/2 cup of flour.
You might not need to add it all just slowly add it until the dough starts to pull away from the sides of the bowl if using a mixer (This puts you at 5 cups of flour) This can be done by hand as well. The dough should be soft, not overly sticky, and not too stiff. You want it to stick to your finger but not stay on your finger in a big clump. -
Transfer the dough
Using a bowl that is 2-3 times the size of the dough, spray with cooking spray or vegetable oil around the sides and bottom of the bowl. Transfer the bread dough from the stand mixer bowl to the oiled bowl and turn over. The oil will keep the bread dough from sticking as it rises and keeps it from drying out. -
Cover dough and let rise.
Cover with plastic wrap and a kitchen towel and allow to rise in a warm place until double in size (usually 40-60 minutes). -
Prepare the rolls
Punch the risen dough down, so it collapses. Then, sprinkle a cutting board, silicone mat or counter with flour and put the dough on the flour. You want to put enough flour on the dough so that it is workable and not sticky. (You can use all-purpose flour for this part if you want.) -
Roll out the dough with a rolling pin.
Roll the dough into a large rectangle about 1/4 inch thick and roughly 15x22 inches in size. I use my thumb and pointer finger to make an "L" as a measurement tool. If you can get 3 rows and at least 10 columns, it's where it should be. Brush the dough with melted butter (about 1/2 cup). If you don't want to do one large rectangle, you can divide the dough into 2 sections and roll 2 rectangles, roughly 11x14 inches in size. -
Cut the dough into 2"x4" rectangles
I like to make an "L" with my thumb and pointer finger that will show how wide and tall to cut the rectangles. If you are using a silicone mat or cutting board, a pizza cutter will really speed up the cutting process.
-
Roll the rectangles into the Lion House shape.
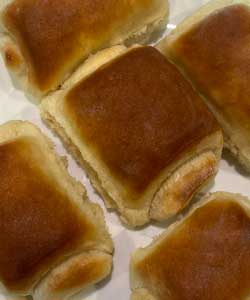
Once the dough is cut, roll them into the Lion House shape which is rolled with the tail of the roll touching the baking sheet and place them on a greased baking pan with the end of the roll resting on the pan.
-
Cover and let rise again.
Cover the rolls again with a kitchen towel so they don't dry out as they rise. Let rise in a warm place until the rolls are double in size (approx. 1-1 1/2 hours).
-
Bake at 350-degrees for 18-20 minutes
You want the rolls to be lightly browned. The time can vary depending on the size of your rolls.
-
Brush with salted butter while hot.
Cut the rolls apart and enjoy!
Nutrition Facts
Servings 30
- Amount Per Serving
- Calories 730kcal
- % Daily Value *
- Total Fat 27g42%
- Saturated Fat 9g45%
- Cholesterol 195mg65%
- Sodium 730mg31%
- Total Carbohydrate 19g7%
- Dietary Fiber 5g20%
- Sugars 10g
- Protein 97g194%
- Vitamin C 10 mg
- Iron 12 mg
- Vitamin E 8 IU
- Vitamin K 5 mcg
* Percent Daily Values are based on a 2,000 calorie diet. Your daily value may be higher or lower depending on your calorie needs.
Note
- Cook this recipe at low heat.
- Use fresh ingredients for better taste
- After cooking, wait for at least 15 minutes for better taste